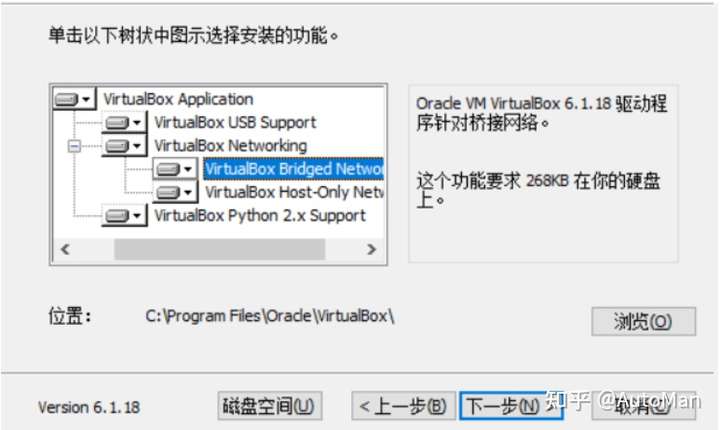
/usr/share/automake-1.10/am/depend2.am: am__fastdepCXX does not appear in AM_CONDITIONAL
/usr/share/automake-1.10/am/depend2.am:   The usual way to define `am__fastdepCXX' is to add `AC_PROG_CXX'
/usr/share/automake-1.10/am/depend2.am:   to `configure.in' and run `aclocal' and `autoconf' again.
src/Makefile.am: C++ source seen but `CXX' is undefined
src/Makefile.am:   The usual way to define `CXX' is to add `AC_PROG_CXX'
src/Makefile.am:   to `configure.in' and run `autoconf' again.
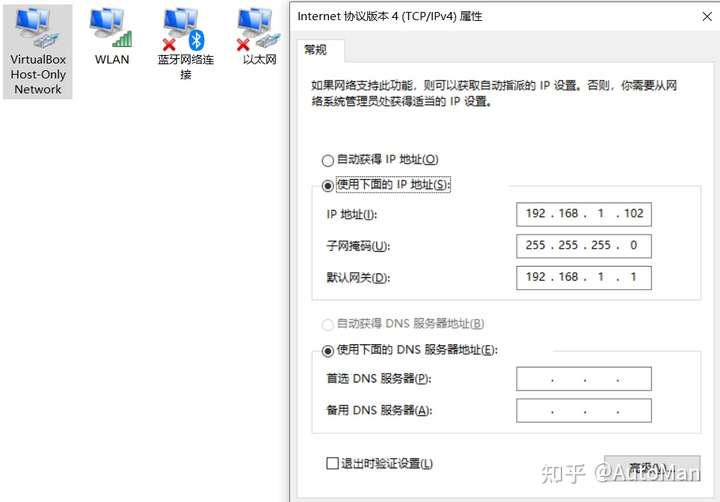
sudo vim /etc/apt/sources.list 1 3、把下面的信息复制到上述文件中ubuntu-12.04、 ubuntu-12.10
deb http://mirrors.aliyun.com/ubuntu/ trusty main restricted universe multiverse deb http://mirrors.aliyun.com/ubuntu/ trusty-security main restricted universe multiverse deb http://mirrors.aliyun.com/ubuntu/ trusty-updates main restricted universe multiverse deb http://mirrors.aliyun.com/ubuntu/ trusty-proposed main restricted universe multiverse deb http://mirrors.aliyun.com/ubuntu/ trusty-backports main restricted universe multiverse deb-src http://mirrors.aliyun.com/ubuntu/ trusty main restricted universe multiverse deb-src http://mirrors.aliyun.com/ubuntu/ trusty-security main restricted universe multiverse deb-src http://mirrors.aliyun.com/ubuntu/ trusty-updates main restricted universe multiverse deb-src http://mirrors.aliyun.com/ubuntu/ trusty-proposed main restricted universe multiverse deb-src http://mirrors.aliyun.com/ubuntu/ trusty-backports main restricted universe multiverse
ubuntu-14.04测试有效
deb http://mirrors.aliyun.com/ubuntu/ trusty main restricted universe multiverse deb http://mirrors.aliyun.com/ubuntu/ trusty-security main restricted universe multiverse deb http://mirrors.aliyun.com/ubuntu/ trusty-updates main restricted universe multiverse deb http://mirrors.aliyun.com/ubuntu/ trusty-proposed main restricted universe multiverse deb http://mirrors.aliyun.com/ubuntu/ trusty-backports main restricted universe multiverse deb-src http://mirrors.aliyun.com/ubuntu/ trusty main restricted universe multiverse deb-src http://mirrors.aliyun.com/ubuntu/ trusty-security main restricted universe multiverse deb-src http://mirrors.aliyun.com/ubuntu/ trusty-updates main restricted universe multiverse deb-src http://mirrors.aliyun.com/ubuntu/ trusty-proposed main restricted universe multiverse deb-src http://mirrors.aliyun.com/ubuntu/ trusty-backports main restricted universe multiverse
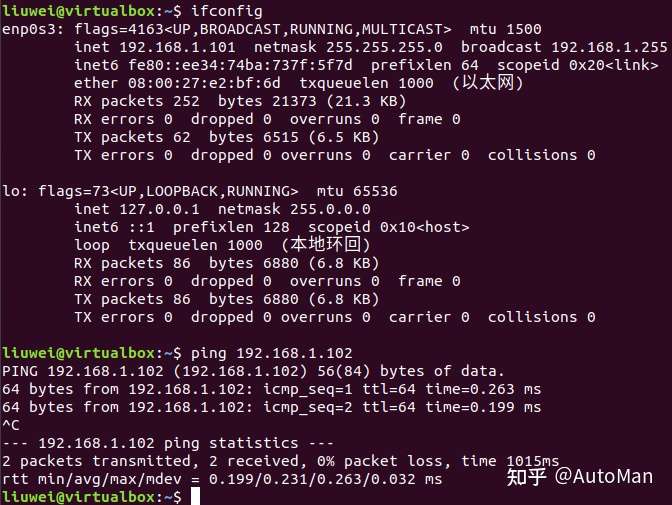
[test@localhost Desktop]$ ./thread
this is func_1!
this is func_2!
this is func_1!
this is func_1!
this is func_2!
this is func_1!
this is func_1!
this is func_2!
this is func_1!
this is func_1!
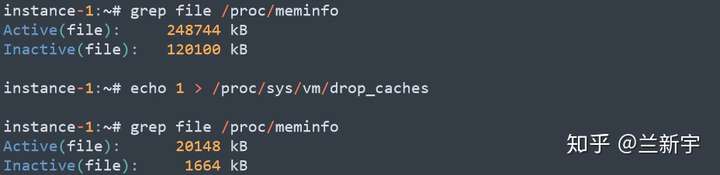
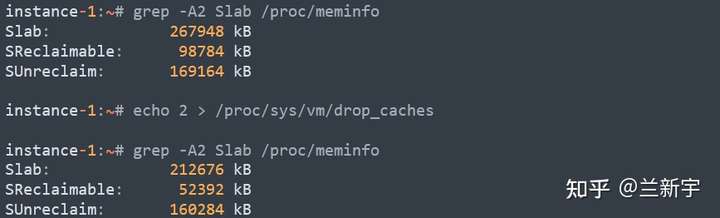
int drop_caches_sysctl_handler(...)
{
    if (sysctl_drop_caches & 1) {
	iterate_supers(drop_pagecache_sb, NULL);
	count_vm_event(DROP_PAGECACHE);
    }
    if (sysctl_drop_caches & 2) {
        drop_slab();
	count_vm_event(DROP_SLAB);
    }
    ...
}
通常这个异常都是空间满导致,查询alter_orcl.log 这个文件一般都能看到错误信息,其中orcl为数据库的sid。 一般都会有类似的日志: ORA-19815: WARNING: db_recovery_file_dest_size of 5218762752 bytes is 100.00% used, and has 0 remaining bytes available.
You have following choices to free up space from recovery area:
Consider changing RMAN RETENTION POLICY. If you are using Data Guard, then consider changing RMAN ARCHIVELOG DELETION POLICY.
Back up files to tertiary device such as tape using RMAN BACKUP RECOVERY AREA command.
Add disk space and increase db_recovery_file_dest_size parameter to reflect the new space.
Delete unnecessary files using RMAN DELETE command. If an operating system command was used to delete files, then use RMAN CROSSCHECK and DELETE EXPIRED commands.
解决方案一、清理文件(如果不想清理文件可以查看解决方案二)
切换到oracle用户执行:
su – oracle
[oracle@db~]$ sqlplus /nolog
SQL*Plus: Release 11.2.0.1.0 Production on Thu Jun 23 17:44:00 2016
Copyright (c) 1982, 2009, Oracle. All rights reserved. sql> conn / as sysdba
Connected to an idle instance.
sql> startup nomount
ORACLE instance started. 再执行 sql> alter database mount;
SQL*Plus: Release 11.2.0.1.0 Production on Fri Jun 24 10:57:02 2016
Copyright (c) 1982, 2009, Oracle. All rights reserved.
SQL> conn /as sysdba Connected to an idle instance. SQL> startup nomount ORA-01012: not logged on SQL> shutdown abort ORACLE instance shut down. SQL> startup nomount ORACLE instance started.
Total System Global Area 1.0689E+10 bytes Fixed Size 2216344 bytes Variable Size 6845107816 bytes Database Buffers 3825205248 bytes Redo Buffers 16945152 bytes SQL> alter database mount;
Database altered.
SQL> show parameter db_recover;
NAME TYPE VALUE
db_recovery_file_dest string /opt/oracle/flash_recovery_are a db_recovery_file_dest_size big integer 3882M SQL> alter system set db_recovery_file_dest_size=80G;
[test@localhost Desktop]$ ./thread
this is func_1!
this is func_2!
this is func_1!
this is func_1!
this is func_2!
this is func_1!
this is func_1!
this is func_2!
this is func_1!
this is func_1!
ubuntu@server:~$ sudo mysqladmin -u root password “123456” mysqladmin: [Warning] Using a password on the command line interface can be insecure. Warning: Since password will be sent to server in plain text, use ssl connection to ensure password safety.
2:第二种方式 登录mysql 更改密码
ALTER USER ‘root’@’localhost’ IDENTIFIED BY ‘654321’;
mysql> ALTER USER ‘root’@’localhost’ IDENTIFIED BY ‘654321’; Query OK, 0 rows affected (0.00 sec)
mysql>
3、消除跳过密码认证,进入正常mysql
vim /etc/my.cnf
把刚刚添加的skip-grant-tables注释或者删除
同样,改了配置文件,要重启服务
systemctl restart mysqld
使用新密码登入
 mysql -uroot -p'123456'

参考文章:https://cloud.tencent.com/developer/article/1661445
         https://blog.csdn.net/weixin_52270081/article/details/121539373
Enter current password for root (enter for none): Just press the Enter button Set root password? [Y/n]: Y New password: your-MariaDB-root-password Re-enter new password: your-MariaDB-root-password Remove anonymous users? [Y/n]: Y Disallow root login remotely? [Y/n]: n Remove test database and access to it? [Y/n]: Y Reload privilege tables now? [Y/n]: Y
Enter current password for root (enter for none):(输入原始root密码,若无则按enter) OK, successfully used password, moving on…
Setting the root password ensures that nobody can log into the MariaDB root user without the proper authorisation. Set root password? [Y/n] (按Y设置root密码)whd-521123 New password: Re-enter new password: Password updated successfully! Reloading privilege tables.. … Success!
Using mod_rewrite or lighttpd you can produce much nicer permalinks (see Pretty Permalinks). There are many different formats, but the most common, and most versatile looks like
http://example.com/2012/post-name/
or
http://example.com/2012/12/30/post-name
Pretty permalinks are available under:
Apache web server with the mod_rewrite module
Nginx using try-files, e.g. according to this tutorial
The mod_rewrite module is enabled by default on CentOS 7. If you find it is not enabled on your server, you can enable it by editing 00-base.conf file located in /etc/httpd/conf.modules.d/ directory.
sudo nano /etc/httpd/conf.modules.d/00-base.conf
Add or uncomment the following line:
LoadModule rewrite_module modules/mod_rewrite.so
Save and close the file, then restart the httpd service:
sudo systemctl restart httpd
Enable .Htaccess File
Once the mod_rewrite module has been activated, you can set up your URL rewrites by creating an .htaccess file in your default document root directory. A .htaccess file allows us to modify our rewrite rules without accessing server configuration files. For this reason, .htaccess is critical to your web server. Before we begin, we need to allow Apache to read .htaccess files located under the /var/www/html directory.
You can do this by editing httpd.conf file:
sudo nano /etc/httpd/conf/httpd.conf
Find the section <directory /var/www/html> and change AllowOverride None to AllowOverride All
 <Directory /var/www/html>
    AllowOverride All
 </Directory>
Linux 内核非常庞大,超过 600 万行的代码。所以我们介绍 Linux 内核,也不可能每一行代码去分析,但是我会提炼其中的重点出来。我们不管学习什么,最关键的是学会其中的思想。
虽然 Linux 内核非常庞大,但是横向对比计算机的发展史, Linux 的历史非常的简短,计算机出现的时候,还没有什么花里胡哨的包装,都是光着身子跑,用技术的语言说就是它只能执行一个任务,执行一个进程,也可以叫“裸跑”,或者称之为是批处理执行任务。学习计算机的同学应该很快明白什么是裸机程序,裸机程序只可以让一个进程使用硬件资源,一次只能完成一个任务,这无形上是对硬件资源的浪费。一开始硬件性能弱的时候这样也没什么问题,但是随着硬件不断地迭代发展,批处理对于硬件的浪费的问题就越来越凸显出来。
可以拿我们的手机来比喻,裸机的话,我们玩王者荣耀的时候,有人打电话进来的话,王者荣耀是要被终止的,后来就有了操作系统,操作系统可以保证多任务执行,同样的 CPU 芯片,有了操作系统,我可以开微信,QQ ,还同时做其他很多事情。
到了1970年,PDP-7 可以运行 GE-635程序了,但是却只能支持两个用户,当时 Brian Kernighan 就开玩笑的称他们的系统是 “UNiplexed Information and Computing Service”,这个缩写就是 UNICS,再后来,大家就取谐音,称为 UNIX。所以1970 年可以称为 UNIX元年。
Dennis Ritchie 和 Ken Thompson
2.13 BSD操作系统
kein toms 1976年去加州大学伯克利分校任教,伯克利软件套件(英语:Berkeley Software Distribution,缩写为 BSD ),也被称为伯克利UNIX(Berkeley UNIX),是一个操作系统的名称。衍生于UNIX(类UNIX)。19世纪70年代由伯克利加州大学的学生比尔·乔伊(Bill Joy)研发出来,也被用来代表其衍生出的各种套件。
BSD 常被当作工作站级别的 UNIX 系统,这得归功于 BSD 用户许可证非常地宽松,许多 1980 年代成立的计算机公司,不少都从 BSD 中获益。比较著名的例子如 DEC 的 Ultrix,以及 Sun 公司的 SunOS等等。1990 年代,BSD 很大程度上被 System V 4.x 版以及 OSF/1 系统所取代,但其开源版本被采用,促进了因特网的开发。BSD 比 Linux 早出现,稳定性和安全性都在 Linux 之上,甚至 Windows 和 OS X 都有来自 BSD 的代码,但是现在一提到开源自由软件,人们首先想到的是Linux,而不是资格更老的BSD。
UNIX创始人之一的 Ken Thompson 曾如此评价 Linux:”Linux不过是反微软思潮下的产物。“这个家伙觉得 Linux 不可能有多大的成就,非常自信的觉得 BSD 在任何时候都可以击败 Linux,甚至觉得Linux 是一个低端和下流的操作系统内核。
因为 UNIX 操作系统的商业化,原来的 UNXI 系统已经不能再被随意的使用,很多人都希望能有一款免费好用的操作系统,因为并不是每个人都很有钱,也不是每个人都有能力自己去写操作系统,此时,理查·斯托曼在麻省理工学院人工智能实验室发起 GNU 计划,希望发展出一套完整的开放源代码操作系统来取代 UNIX,计划中的操作系统,名为 GNU(GNU is Not Unix)。
1983年9月27日,理查·斯托曼在 net.UNIX-wizards 和 net.usoft 新闻组中公布这项计划。在此项计划中,开发出了很多我们现在熟悉的常用的工具,包括GNU编译器套装(GCC)、GNU的C库(glibc)、以及 GNU 核心工具组(coreutils)。另外也是 GNU 除错器(GDB)、GNU 二进制实用程序(binutils)的 GNU Cash shell中 和 GNOME 桌面环境,(但是软件还是基于Unix内核的)。
Linux 的第一个版本在 1991 年 9 月被大学 FTP server 管理员 Ari Lemmke 发布在 Internet上。最初 Torvalds 称这个内核的名称为 「Freax」,意思是自由「free」和奇异「freak」的结合字,并且附上「X」这个常用的字母,以配合所谓的类 UNIX 的系统。但是 FTP 服务器管理员嫌原来的命名「Freax」的名称不好听,把内核的称呼改成Linux。当时仅有 10000 行代码,仍必须运行于Minix操作系统之上,而且必须使用硬盘开机,随后在10月份第二个版本(0.02版)发布,与此同时这位芬兰赫尔辛基的大学生在 comp.os.minix 上发布了这样一则公告
Hello everybody out there using minix- I’m doing a (free) operation system (just a hobby, won’t be big and professional like gnu) for 386(486) AT clones.
1994 年 3 月,Linux1.0 版正式发布。为了让 Linux 可以在商业上使用,林纳斯·托瓦兹决定更改他原来的协议(这个协议会限制商业使用),以 GNU GPL 协议来代替。之后许多开发者致力融合 GNU 元素到 Linux 中,做出一个有完整功能的、自由的操作系统。
一些个人和企业开发的第三方的非 GNU 组件也在提供对 Linux 内核的支持,这些第三方组件包括大量的作品,有内核模块和用户应用程序和库等内容。
Linux 社区或企业都会推出一些重要的 Linux发行版,包括 Linux内核、GNU组件、非GNU组件,以及其他形式的的软件包管理系统软件。
Linux 内核现在覆盖的领域非常广,手机、平板、路由器等等,就大家非常喜欢的苹果操作系统,底层内核也是有 Linux的影子,Linux 的普及毋庸置疑,学习 Linux 应该作为每个技术人员的标配。学习完 Linux 内核你会对整个计算机体系有一个更深刻的认知,作为一个开发者,不管你从事的是驱动开发,应用开发,还是后台开发,你都需要理解计算机操作系统和内核的运行机制,才可能更好的编写你的代码,出现更少的错误。作为开发人员,不应该只局限在自己的小领域,因为你设计的模块,看起来非常小,但是你不了解进程的调用机制,不知道进程会阻塞,就绪,执行几个状态,你怎么可能编写好一个低容错率的代码呢?